User Guide for Managing Employees Module
Managing Employees overview
The Employees Management Module allows HR teams to manage employee profiles, track their status, and update key details. The following features are available:
Employees List
- Displays a list of all employees, including their name, designation, department, pay group, employment status, and joined date.
- Employee profiles are represented with initials and color-coded circles.
- Employees can be searched using filters such as Employee Name, Department, and Pay Group.
- The View button allows users to see detailed employee information.

Searching and Filtering Employees
The Employees Management Module provides robust search and filtering options to efficiently locate and manage employee records. Follow these steps to use the search and filter functions effectively:
Using the Search Bar
- Locate the search bar at the top of the Employees page.
- Enter the employee's Name, Employee Code, NIC, or EPF No based on the selected filter option.
- Click the Search button to display matching results.

Applying Filters
- Click on the Filter Dropdown next to the search bar.
- Select a filter option:
- Employee Name: Search employees by name.
- Employee Code: Filter using unique employee identification codes.
- NIC: Search by National Identity Card number.
- EPF No: Filter employees based on their Employee Provident Fund number.
- The employee list will update based on the selected criteria.
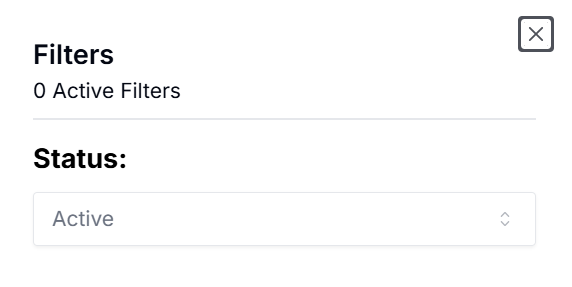
Managing Active Filters
- The employee list will update based on the selected filter criteria.
- To refine the search further, click on the Active Filters button, which appears when filters are applied.
- To remove filters, either click Clear Filters or manually deselect applied filters by selecting All in the dropdown menu.
Adding a New Employee
The Add New Employee feature allows HR teams to register a new staff member or labor worker in the system. Follow these steps to add a new employee:
- Navigate to the Employees module from the left sidebar.
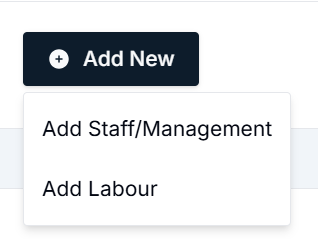
- Click the Add New button at the top of the Employees page.
- Select the type of employee you want to add:
- Add Staff/Management: For office-based employees and managerial roles.
- Add Labour: For field workers, contract employees, and labor personnel.
User Guide for New Labour Registration
The New Labour Registration form is used to add new labor employees to the system, capturing important personal, contact, and employment details. This guide provides step-by-step instructions on how to complete the form.
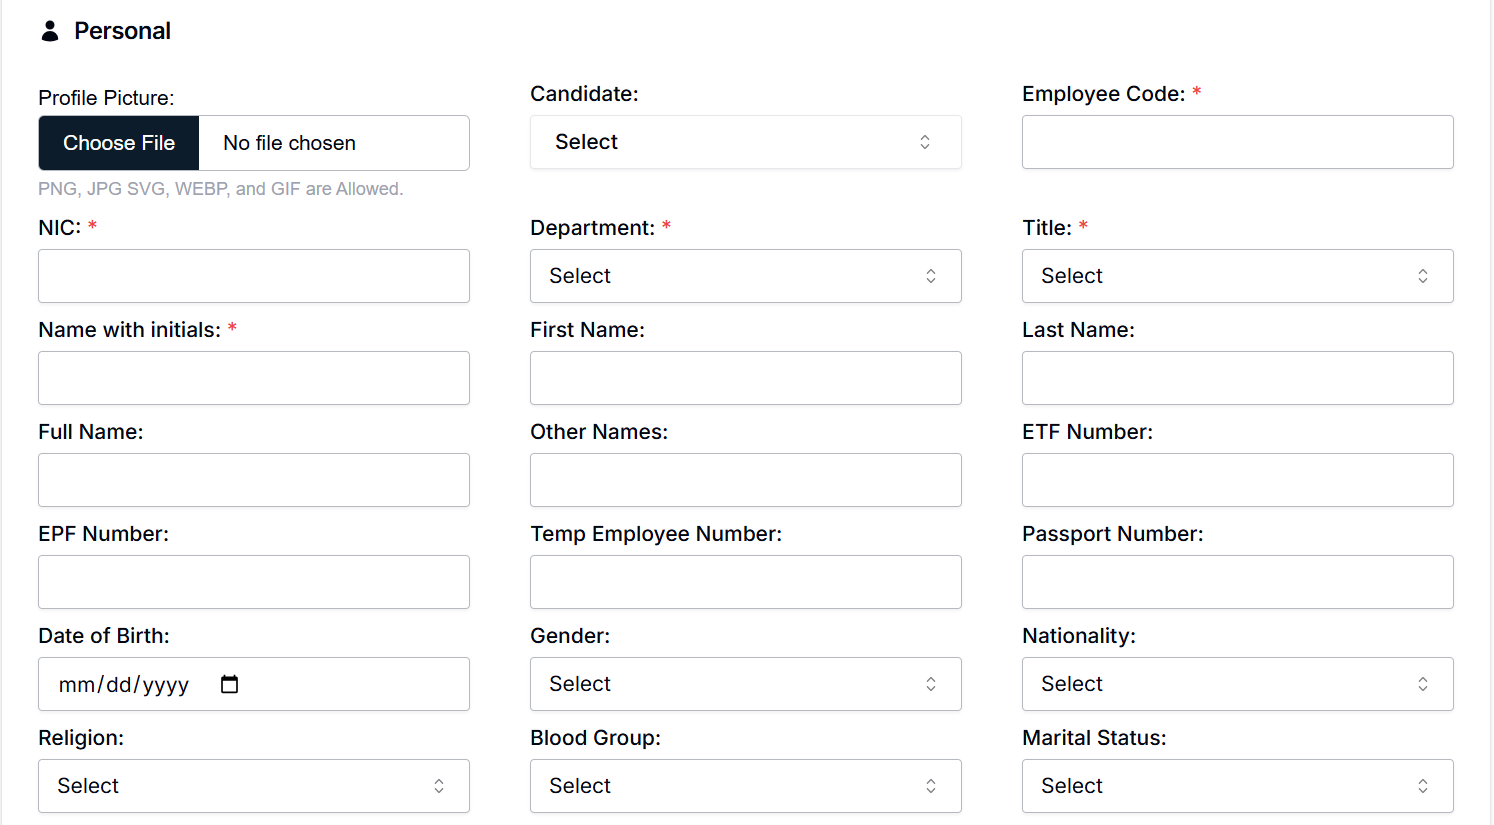
Personal Information
- Profile Picture: Upload a profile picture for the employee (optional). Only PNG, JPG, SVG, WEBP, and GIF formats are allowed.
- NIC (National Identity Card Number): Enter the employee's NIC number.
- Name with Initials: Input the employee’s name with initials.
- Full Name: Enter the full name of the employee.
- EPF Number: Provide the employee’s EPF number.
- Date of Birth: Input the employee’s date of birth.
- Employee Code: Assign a unique employee code for identification.
- Candidate: Select the candidate type (e.g., new applicant).
- Department: Choose the department the employee will be assigned to.
- Title: Select the employee's title (Mr./Ms., etc.).
- Last Name: Enter the last name of the employee.
- ETF Number: Provide the employee’s ETF number.
- Passport Number: Enter the employee’s passport number (if applicable).
- Nationality: Select the employee’s nationality.
- Religion: Select the employee's religion.
- Blood Group: Select the employee’s blood group.
- Marital Status: Choose the marital status of the employee.
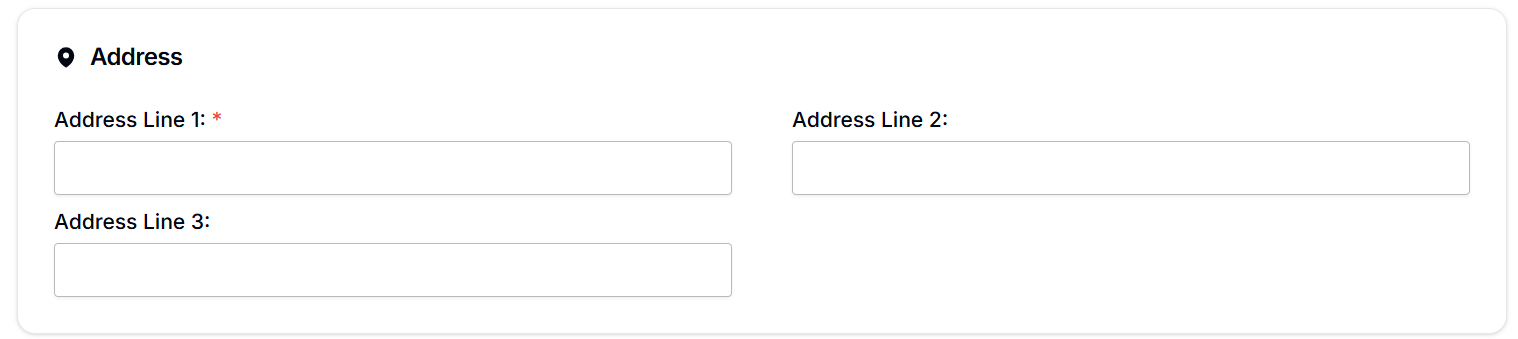
Address Information
- Address Line 1: Enter the primary address (required).
- Address Line 2: Enter additional address details (optional).
- Address Line 3: Further address details (optional).
Contact Information
- Fixed Phone: Enter the employee’s fixed landline phone number.
- Mobile Phone: Enter the employee’s mobile phone number.
- Email: Provide the employee’s email address.

Bank Details
Fill out the employee’s banking details for salary processing.
- Bank: Select the employee’s bank from the list.
- Bank Account Number: Enter the bank account number.
- Branch Name: Input the branch name of the employee's bank.

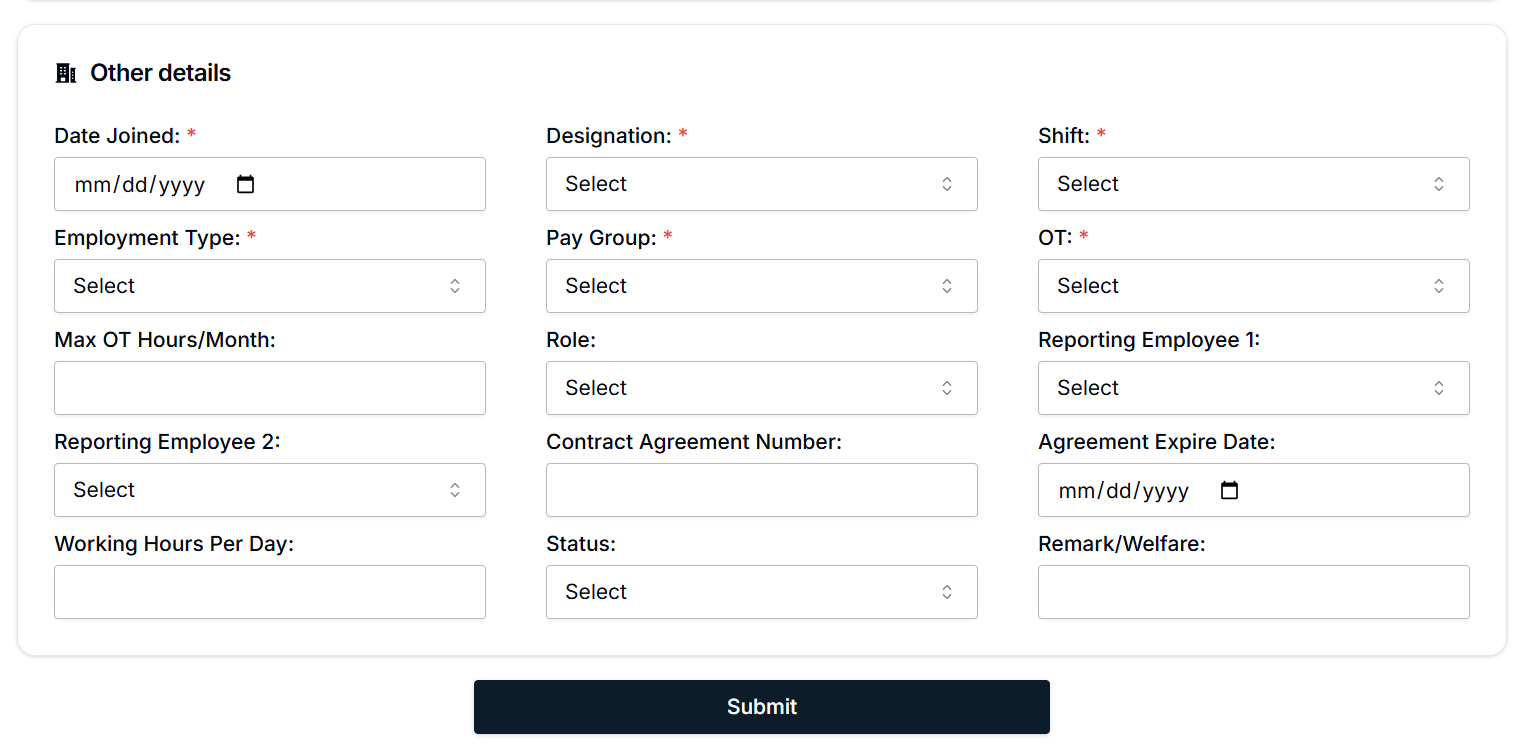
Other Employment Details
This section contains details related to the employee's role and employment conditions.
- Date Joined: Enter the employee's official joining date.
- Employment Type: Select the employment type (Full-time, Part-time, Temporary).
- Max OT Hours/Month: Enter the maximum overtime hours allowed per month.
- Working Hours Per Day: Specify the number of working hours per day.
- Designation: Select the employee’s job role/designation.
- Pay Group: Select the pay group to categorize the employee (e.g., EPF Staff, Non-EPF Labour).
- Shift: Select the shift type (e.g., Day, Night).
- OT (Overtime): Specify if overtime applies to the employee.
- Reporting Employees: Choose the employees the new hire will report to (1st and 2nd).
- Contract Agreement Number: Enter the contract agreement number (if applicable).
- Agreement Expiry Date: Specify the contract’s expiry date (if applicable).
- Status: Select the employment status (e.g., Active, Inactive).
- Remark/Welfare: Input any additional remarks or welfare information for the employee.
How to Submit the Registration
- Ensure all required fields are filled accurately. These fields are typically marked with a red asterisk (*).
- Review all entered information to ensure there are no errors.
- Once the form is complete, click Save to register the new labour employee in the system.
- After saving, the employee will be added to the employee list and can be viewed or updated from the Employees section.
User Guide for New Staff Registration Process
This section of the user guide explains how to register new staff within the HRIS system, which is divided into several steps, from personal details to other employment-related data.
Step-by-Step Process for Registering a New Staff Member
Personal Details
- Profile Picture: Click on the Choose File button to upload the staff member's profile picture (PNG, JPG, SVG, WEBP, and GIF file types are supported).
- NIC: Enter the National Identity Card number.
- Name with Initials: Enter the initials of the staff member.
- Full Name: Input the complete name of the staff member.
- EPF Number: Enter the Employee Provident Fund (EPF) number.
- Date of Birth: Select the date of birth in MM/DD/YYYY format.
- Employee Code: Enter a unique code for the staff member.
- Department: Select the relevant department from the dropdown.
- Title: Select the staff member's title (e.g., Mr., Mrs., Dr.).
- Gender: Choose the gender of the staff member.
- First Name and Last Name: Enter the first and last names.
- Other Names: If applicable, enter any other names the staff member is known by.
- Temp Employee Number: If applicable, input the temporary employee number.
- ETF Number: Enter the Employee Trust Fund (ETF) number.
- Passport Number: If available, input the staff member’s passport number.
- Nationality: Select the nationality from the list.
- Religion: Select the religion of the employee.
- Blood Group: Choose the blood group.
- Marital Status: Select the marital status.
Contact Information
- Fixed Phone: Enter the fixed phone number.
- Mobile Phone: Input the mobile phone number.
- Email: Enter the staff member’s email address.
Address Information
- Address Line 1: Fill in the primary address.
- Address Line 2: Fill in any secondary address information (if applicable).
- Address Line 3: Fill in any additional address information (if applicable).
Bank Details
- Bank: Select the bank where the employee holds an account.
- Bank Account Number: Enter the bank account number.
- Branch Name: Enter the bank branch name.
Other Employment Details
- Date Joined: Select the date the staff member joined the company.
- Employment Type: Choose the type of employment (e.g., Full-time, Part-time, Contract).
- Designation: Select the job title or designation.
- Pay Group: Select the pay group under which the employee will be classified.
- Role: Specify the role the staff member will hold.
- Contract Agreement Number: If applicable, input the contract agreement number.
- Shift: Choose the staff member’s shift.
- OT (Overtime): Select whether the employee has overtime and input the details.
- Reporting Employee 1 and 2: Select the employees the new staff member will report to.
- Working Hours Per Day: Specify the number of working hours expected per day.
- Max OT Hours/Month: Input the maximum overtime hours allowed per month.
- Status: Set the employment status (e.g., Active, Probationary, Inactive).
- Agreement Expire Date: If applicable, set the expiration date for the staff member's agreement.
- Remark/Welfare: Any additional remarks or welfare details.
Submit the New Staff Information
- Review all the entered details to ensure accuracy.
- Click the Submit button to complete the registration of the new staff member.
Important Notes
- Fields marked with an asterisk (*) are mandatory and must be filled in before submitting the form.
- Ensure that the Profile Picture and all other document uploads meet the specified file type requirements.
- If any information is incorrect or incomplete, the system may prompt you to correct it before submission.
Conclusion
Once the new staff registration is completed, the system will process the information, and the staff member's profile will be created. You will be able to view and edit the employee details from the Employee Management module as needed. This guide ensures that you can successfully register new staff members and manage their personal and employment details effectively within the HRIS system.